 A word from my sponsors
|
Welcome to My....Ummm...Page thingie!
This site basically consists of anything that I want it to consist of. You know what? I bet that nobody is even reading this! I know when I go to a site, I don't bother with the script, I head straight for the pictures or something like that. Soo...I'll stop wasting my time here, toodles!
Wanna read my stories? Go here and search for EDPTgirl
Almost all of the images that I'm putting on this page will be made via Photoshop 6.0 (not the sponsor ones, of course). I'm just learning how to use it, so please be patient. Eheh. I have a really short, yet REALLY helpful tutorial below, if any other newbies to that program want to check it out.
|
Photoshop! Layers and Shading.
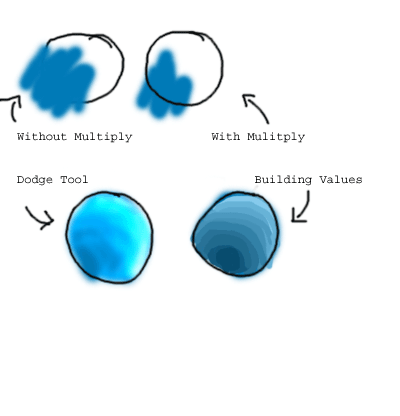
Ok, the first thing you need to do is draw the picture. I feel like I don't need to explain where the drawing tools are on the menu... Anyways, after you're done, you might want to do some shading, or just plain old coloring in. Sure, anybody can do that, but I know a 'trick' I guess you could call it, to make at a whole lot easier. Ok, you're done with the 2D drawing, now, at the top of the screen, there's a button to press that's called 'layer'. You click on that button, and from there, go to 'new'. That'll make a new layer, which should be named 'layer 1'. Now, on the right side of the screen, in a little box, should be a list of all of the layers you have. Right click on the picture of layer 1, and go to 'blending options'. Once the little bow thing comes up, go to that place right under where it says Blending Options General Blending, and there should be a thing that says 'Blend Mode'. Go to the thing next to it, and choose 'Multiply', then press 'ok', and it's done. Now, the color or shading that you put down won't interfere with the lines already drawn. For blending, there are two ways which work pretty good. In the tool bar, there should be a black circle with a line coming out form it. It's called the 'Dodge Tool'. That makes colors brighter for highlights. While using the dodge tool, there's 3 options, shading, middle tones, and highlights. Highlights are the brightest ones, and shading is the darkest. What I do, is I pick out the darkest value that I'm going to need. Like, for example, for the skin, I pick a dark brown, the color that's going to be the darkest, and then I use the dodge tool. That way, the darks are already taken care of, and you just use the dodge tool to do the lights. The other way is to pick a middle tone color, and then create all the steps from there. For example, if you're doing a pait of blue jeans, then you pick the color blue you want it to be, fill in the jeans with it, and then build the values. You use that same blue, and keep on editing it to made it darker for shading, and lighter for highlighting, and all of the values inbetween. This takes ALOT of time, and is alot harder than the dodge tool, but I reccommend using both methods in the same picture, it'll turn out better that way.
|
 umm...see above for what I'm talking about
|
Excess Tips
After doing the shading, you may or may not want to use the blur tool to make the contrast between dark and light more smooth. While working with the regular paintbrush, put the mouse over your canvas, right click, and experiment with all of the options. Keep in mind you have to draw before experimenting, or else the effects wont have anything to work with.
Need more info about photoshop? Go here.
|
|